Yendor's Simple UK Happy Hardcore Tutorial
Happy Hardcore is the bastard red-headed step-child to DnB. Pioneered back in the late 80s to early 90s it was a staple for a time for when the rave scene was more of a social gathering. The beats were fast, the stabs were... stabby, and a lot more experimental. Furthering on into late 90s and 2000s Happy hardcore took on many different forms such as Freeform, UK, Makina (Spanish), PowerStomp, Gabber, with tempos ranging from 160 to 180bpm... and the list goes on. It took the masculine elements of the drum and bassline and feminine elements of melody and voice to create powerful songs that still resonate in electronic music today, I would suggest looking up on youtube for classic and modern versions of hardcore.
I listened to UK hardcore back in 2016 at a very low point in my life when my career was killing mentally and I accredited it for saving my life. I did everything I could to go to raves with DJs that played it, I even DJ'd in basements and stages in Philadelphia and Baltimore, and then I took the steps to learn how to make it.
I was taught by DJ Infinite, who is a Makina producer and VST creator at Rewired Records. Do check out his site if you fancy, he has courses available (but not for free). I like to credit him in part as I am sharing some knowledge I got from him to you. Although I can't show you everything that encompasses this genre, I will show you the steps you can do right now to inspire you to try out the instruments in your DAW (Digital Audio Workspace).
This tutorial assumes you are new to DAW workflow and FL studio in general. Feel Free to work your wizardry with your existing knowledge and tools if you are an advanced dark music wizard.
Now that the boring opening is done, lets get the checklist of what you need:
1. A legal copy of Windows or Mac
2. A legal copy of at least the 2024 version of FL studio (or another legal copy of a DAW of your choice, FL is all I know and thats what I will be teaching you in, I believe the trial version should suffice).
3. (Optional) Grab VSTs (Virtual instruments) and sample sound packs for your DAW if the ones that come with FL studio by default don't fit your fancy. DnB packs are optimal. I encourage you to experiment till you find something you like. Avoid sketchy websites offering pirated versions of paid VSTs... I cannot stress how difficult it is explaining to law enforcement/other musicians, or your distributor/record company on why you don't have a license for such and such when an audit is performed. x(
Steps:
We will need to set up our percussion and bass template.
Step 1: Open FL Studio 2024 and select Default basic 808 with limiter (this is for your safety and sanity).
Step 2: Up in the top left should be a project tempo number. Change that from 130bpm to 170 (my preferred speed).
Step 3: The channel rack with the gray and red buttons should be on your screen, we are going to be here awhile building your percussion, near the center on top it should say "Pattern 1". Right Click and Change that to "WORKBENCH" and color it yellow (this is so we don't accidently use this pattern anywhere later).
Step 4: Create the following pattern with the default 808 sounds:
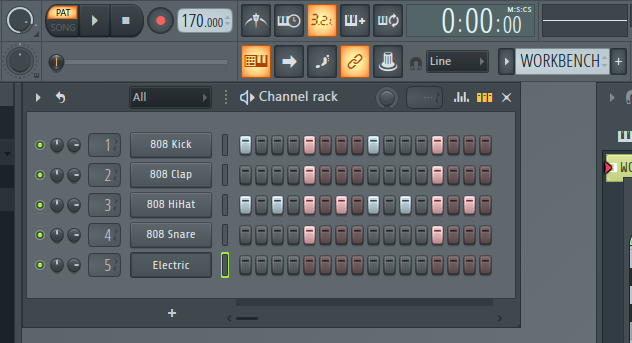
Step 5: In channel 5 right click and change the instrument to Sytrus (it should already be with your copy of FL studio), Change and highlight every 3rd button for each for beat and change the sound from its default noise to "electric" in Bass section in Sytrus. You can to this in the top right corner of the VST.
\
For advanced dark wizards only: Serum will work fine in this channel, cast either a basic bass spell here or something more sharp and punchy, add chorus in serum to achieve harmony in your spell.
Step 6: If beginning wizards have attempted to cast early, you'll notice it doesn't sound very good-- We must now adjust in the piano roll so that all the sounds do not roll on top of each other, and play and stop at the time they are meant to. Right-Click on each channel and select "piano roll" and change the notes to Half-notes. Use ctrl+A while in the piano sheet and select the end of one note to drag all of them out to half at the same time!
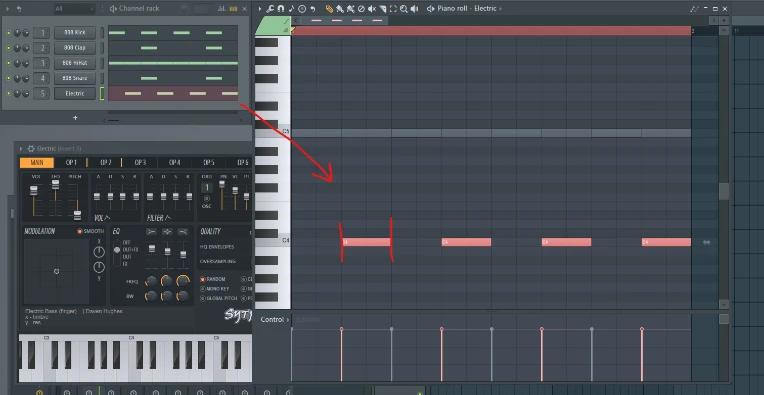
Step 7: Change the Sytrus notes from C5 to C4, we are lowering these notes an octave to get that classic UK hardcore bass sound. For advanced dark wizards only: Serum doesn't play well with octave adjustment in this space, tweek spell accordingly in the Serum VST.
Step 8: Press play. What you should hear is almost perfect call and response of the kick and the sytrus electric bass note bouncing between each other while the high hat carries the percussion along with the clap and snare hitting every other beat!
Congrats! You've created your UK Hardcore percussion template! We are far from done as we now must create a melody! This will require music theory! Don't worry if you don't know Music theory! I'll give you the notes for a chorus pattern that goes well with this genre. You may also search for chords that work in a 4:4 music sheet for this genre! Feel free to use different kicks, hats, snares etc from another soundpack if you don't like the default 808 ones in FL Studio!
Building the melody:
We will now write a melody using a chord. The easiest way IMO to write a melody is along a chord. You can find lots of chords by either looking in packs online paid or free, or look at sheet music of popular songs with a 4/4 pattern. There is also AI tools out there that can highlight chords for you in popular songs but lets not get ahead of ourselves....
Here is a free chord written in G Major - E minor in midi format. Dark Wizards may write their own or follow a different music theory path. But it is important you follow the bassline since you already used your crystal balls to cheat on this exam! 10 points from Gryffindor!
Step 1: Download the zip file your desktop and extract the midi file there (or wherever you organize your files).
Step 2: In FL Studio channel rack click on the '+' button and add FL keys and set the channel number to "6"
Step 3: Drag the midi file to the FL Keys channel, click accept on the prompt. When we open the piano roll on FL keys channel it should look like this:

Now, if you look at this sheet, this is the "Base" for our melody magic! The bottom represents where are baseline is going to be for Sytrus, and the top line is where our notes for a melody will be!
Step 4: To the left of each channel in your channel rack there is a green button. Click each one from channel 1 to 4 to silence those channels for now.
Step 5: Open the piano roll for sytrus on channel 5. We will write half notes along the bassline of our chord which you can see 'ghosted' in the piano roll like so:

Beginning wizards after doing this may press play. Listen to the FL key Chord and sytrus bass-- Do you understand why the bassline is important now? You are halfway done and it already sounds good! :)
Step 6: We are now going to silence our newly created bassline for now, and clone the FL keys channel so we may write our melody along the topline in our chorus! Click the green button next to channel 5, then right-click on channel 6 and select 'clone'. This will create a new channel with the same number! Change the new channel number to 7, and open its piano roll, and then write a melody along the top line, but do not stray from the top line just yet! Dark Wizards may disobey this rule and write a masterpiece!
Here is the example I wrote:

Look familiar? If you look back at the FL Keys I wrote a call and response type melody over the topline!
Now... Turn everything back on and hit play:

Congrats! You've created a loop of a basic happy hardcore song with stock plugins!
Psst... You now that melody you wrote thats on that on that one channel? Replace it with sytrus but don't change the sytrus instrument and hit play:

Hell yeah, you are going places!
From workbench to main workspace:
Ok, so at this point we have our basic loop but its stuck in the channel rack all in one pattern called "workbench". In order to separate the instruments so we can work with them in our main music sheet, we need to do this:
Step 1: Click at the top in the menubar in FL studio "Patterns" and select "Split by channel", this will split everything in your workbench pattern into its own pattern.
Step 2: Get creative! Start with percussion or maybe the piano? Or maybe the bassline and bring in the melody? The choice is yours! But if you want your stuff to match up to the producers already out there, take some time to study the DJ edits of their songs and see if you can match them!
Step 3: ???
Step 4: PROFIT or don't!
Here is my rendition of the loop, the only difference is that I added sub-bass, two layers for the melody, and swapped the fl keys for the chords for the soundfont player.
With the right tools and practice, this is what a more masterful version sounds like:
Keep Happy Hardcore alive! Happy Tutorialing!